1
2
3
4
5
6
7
8
9
10
11
12
13
14
15
16
17
18
19
20
21
22
23
24
25
26
27
28
29
30
31
32
33
34
35
36
37
38
39
40
41
42
43
44
45
46
47
48
49
50
51
52
53
54
55
56
57
58
59
60
61
62
63
64
65
66
67
68
69
70
71
72
73
74
75
76
77
78
79
80
81
82
83
84
85
86
87
88
89
90
91
92
93
94
95
96
97
98
99
100
101
102
103
104
105
106
107
108
109
110
111
112
113
114
115
116
117
118
119
120
121
122
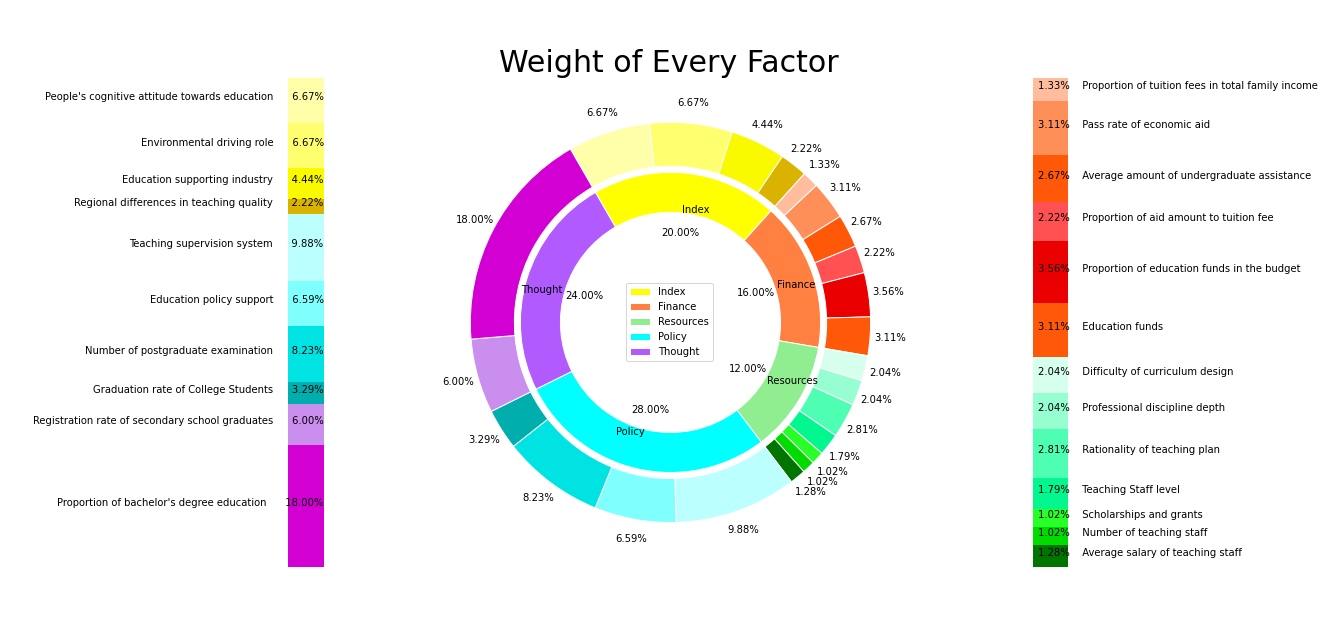
| from matplotlib.patches import ConnectionPatch
angle = 120
fig,[ax0,ax1,ax2] = plt.subplots(ncols = 3,figsize = [27,9])
names = ['Index','Finance','Resources','Policy','Thought']
weights = [0.2,0.16,0.12,0.28,0.24]
cc = ['yellow','#ff8040','lightgreen','#00ffff','#b15bff']
cc.extend(['red']*4)
ax1.pie(weights,labels = names,
explode = [0,0,0,0,0],
colors = cc,
shadow = False,
autopct = '%.2f%%',
startangle = angle,
counterclock = False,
radius = 0.75,
labeldistance = 0.75,
pctdistance = 0.6,
textprops = None,
wedgeprops = dict(width = 0.2,edgecolor = 'white')
)
ax1.legend(loc = 'center')
color = ['#ffffaa','#ffff6f','#f9f900','#d9b300']
color.extend(['#ffbd9d','#ff8f59','#ff5809','#ff5151','#ea0000','#ff5809'])
color.extend(['#d7ffee','#96fed1','#4efeb3','#02f78e','#28ff28','#00db00','#007500'])
color.extend(['#bbffff','#80ffff','#00e3e3','#00aeae'])
color.extend(['#ca8eef','#d200d2'])
small_n = ['','','','','','','','','','','','','','','','','','','','','','','']
small = [6.667,6.667,4.444,2.222,1.333,3.111,2.667,2.222,3.556,3.111,2.043,2.043,2.809,1.787,1.021,1.021,1.277,9.882,6.588,8.235,3.294,6,18]
ax1.pie(small,
labels = small_n,
explode = [0]*23,
colors = color,
shadow = False,
autopct = '%.2f%%',
startangle = angle,
counterclock = False,
radius = 1,
labeldistance = 0.85,
pctdistance = 1.1,
textprops = None,
wedgeprops = dict(width = 0.22,edgecolor = 'white')
)
ax1.axis('equal')
lll = [1.333,3.111,2.667,2.222,3.556,3.111,2.043,2.043,2.809,1.787,1.021,1.021,1.277]
colorssss = ['#ffbd9d','#ff8f59','#ff5809','#ff5151','#ea0000','#ff5809','#d7ffee'
,'#96fed1','#4efeb3','#02f78e','#28ff28','#00db00','#007500']
colorssss.reverse()
lll.reverse()
ttt = ['Proportion of tuition fees in total family income'
,'Pass rate of economic aid'
,'Average amount of undergraduate assistance'
,'Proportion of aid amount to tuition fee'
,'Proportion of education funds in the budget'
,'Education funds'
,'Difficulty of curriculum design'
,'Professional discipline depth'
,'Rationality of teaching plan'
,'Teaching Staff level'
,'Scholarships and grants'
,'Number of teaching staff'
,'Average salary of teaching staff']
tttr = ttt.copy()
tttr.reverse()
rates = (np.array(lll)/sum(lll)).tolist()
posX = -0.1
floor = 0
width = 0.2
for i in range(len(rates)):
height = rates[i]
ax2.bar(posX,height,width,bottom = floor,color = colorssss[i])
posY = ax2.patches[i].get_height() / 2 + floor
ax2.text(posX-0.07,posY,'%.2f%% ' % (lll[i])+ tttr[i], ha = 'left')
floor += ax2.patches[i].get_height()
ax2.set(ylim = [0,1],xlim = [-0.5,2],title = '')
ax2.axis('off')
lll = [6.667,6.667,4.444,2.222,9.882,6.588,8.235,3.294,6,18]
colorssss = ['#ffffaa','#ffff6f','#f9f900','#d9b300','#bbffff','#80ffff','#00e3e3','#00aeae','#ca8eef','#d200d2']
colorssss.reverse()
lll.reverse()
ttt = ['Proportion of bachelor\'s degree education'
,'Registration rate of secondary school graduates'
,'Graduation rate of College Students'
,'Number of postgraduate examination'
,'Education policy support'
,'Teaching supervision system'
,'Regional differences in teaching quality'
,'Education supporting industry'
,'Environmental driving role'
,'People\'s cognitive attitude towards education']
tttr = ttt.copy()
tttr.reverse()
rates = (np.array(lll)/sum(lll)).tolist()
posX = 1.7
floor = 0
width = 0.2
for i in range(len(rates)):
height = rates[i]
ax0.bar(posX,height,width,bottom = floor,color = colorssss[i])
posY = ax0.patches[i].get_height() / 2 + floor
ax0.text(posX+0.1,posY,ttt[i]+' %.2f%%' % (lll[i]), ha = 'right')
floor += ax0.patches[i].get_height()
ax0.set(ylim = [0,1],xlim = [-0.5,2],title = '')
ax0.axis('off')
ax1.set_title('Weight of Every Factor',fontsize = 30)
plt.savefig('Weight of Every Factor.png')
|